POS
Sales Checkout
POS
Purchase Checkout
Delete/Cancel
Purchase
Issue
Quotation
Sales
Checkout(Quotation)
E
Filing Wizard
POS
Sales Checkout
In this menu you can sell items with or without customer
Details. If you want to include customer details then select Include Customer
Details from Setup->Default Settings->POS Default Settings.
By giving customer ID you can select customers. If you need
more details, then click on Find button. When you click on Find button,
another window Find Customer will appear. Find Customer Screen is as
shown in Fig 124
Then you can select Item Id or Item Name and enter the
Quantity to be sold. In the case of Barcode Readers you need to enter Item Id
Only. There is also a provision to change the category of any item.
If you want to print the receipt, then select Always
Print Sales Receipt option in from Setup->Default Settings->Print
Settings or alternatively you can tick the print receipt checkbox. You
can give Discount and Handling Charge by selecting Allow Handling Charge,
and Allow Discount option from Setup->Default Settings->POS Default
Settings. You can also select Method of Payment. Net Amount, Tax Amount and
grand total will generate automatically.
If you want to adjust the Bill amount with Customer
Balance, Select Customer Adj Button, enter the amount and click Ok.
Manufactures and Dealers need to enter Order details, which
can be done Using Order Details Tab.
POS Sales Checkout Window is as shown in Fig
122.
POS Checkout supports different types of Receipts which are
suitable for ‘THE KERALA VALUE ADDED TAX RULES, 2005’ as well as general
formats. In order to set the bill type you can select Bill Type from Set up->
Default Settings ->POS Print Settings. Receipt of POS sales checkout is as
shown in Fig 123.
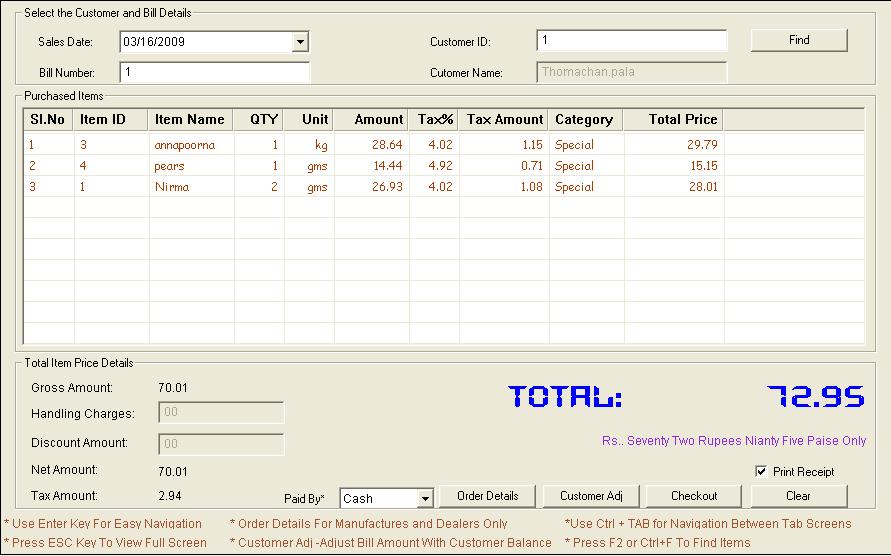
Fig 122: Sales Checkout Window with the items purchased for a customer
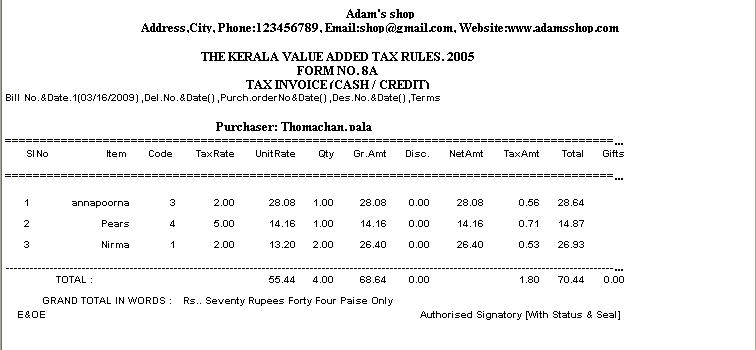
Fig
123: Receipt of Sales Checkout
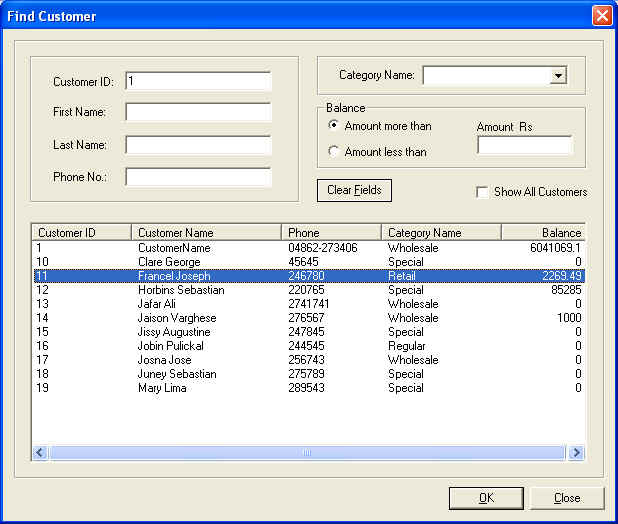
Fig
124: Find Customer Screen
POS
Purchase Checkout
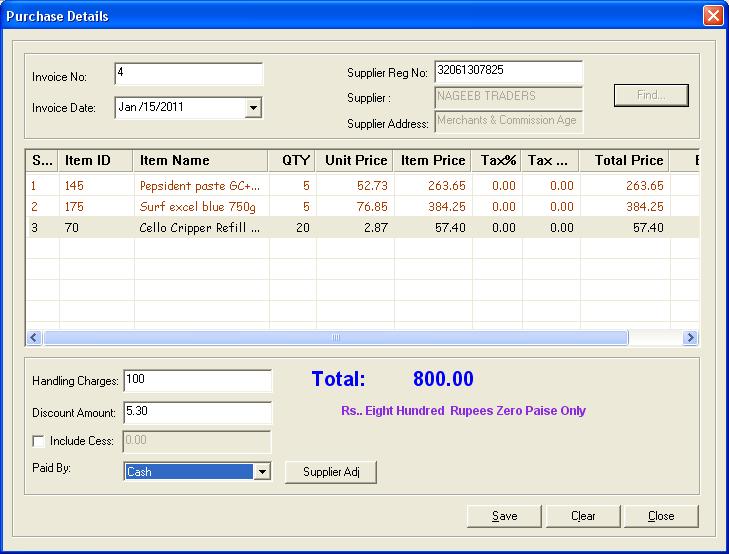
Using this menu you can Purchase items.If you want to
include Supplier details, add Supplier from Setup->POS ->Supplier Info. By giving Supplier Registration number you can select
suppliers. If you need more details, then click on Find button. When you
click Find button, another window Find Supplier will be up.
Then you can select Item Id or Item Name and enter the
Quantity to be purchased. In the case of Barcode Readers you need to enter Item
Id Only.
There is provision to give Discount and Handling Charges.
unit price,Item price,Tax%,Tax Amount and total price will be generated
automatically from the details you have given in the Add New Stock Item
dialog.
POS purchase Checkout Window is as shown in Fig
125.
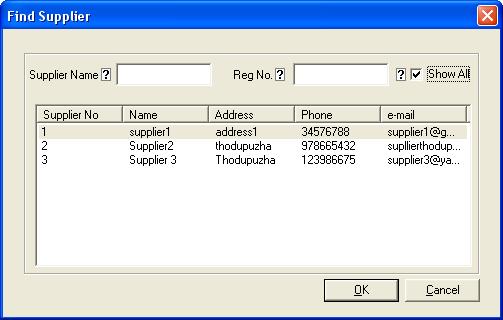
For finding Supplier, Find Supplier Window is as
shown in Fig 126.
Fig
125: POS Purchase checkout Screen
Fig
126: Find Supplier Screen
Delete/Cancel
Purchase
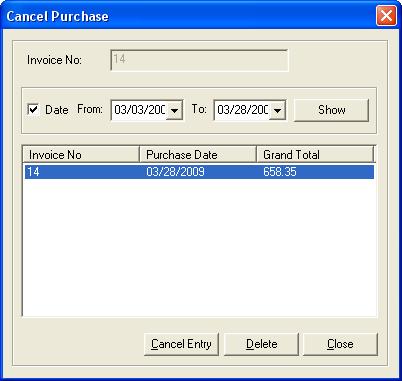
In this menu you can Cancel /Delete purchased items. In
order to display details of purchase either you can enter Invoice Number or
specify a period. In order to give Date ,First select Date (Checkbox) then give
range of dates. Cancel Purchase window is as shown in Fig
127.
If you want to Cancel the purchase,select a purchase from
the list and click on Cancel Entry ; you will get another window Cancel
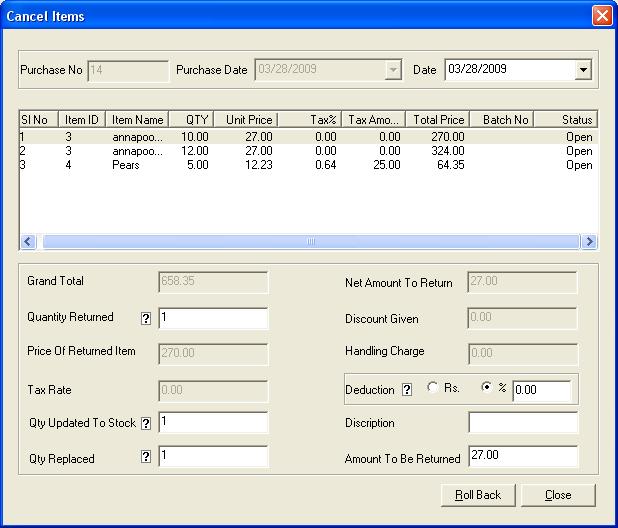
Items. Cancel Items window is as shown in Fig 128.
Items Purchased corresponding to Invoice No: will be
displayed as a list in cancel items. From there you can select the cancelling
item. By default, Qty Returned is same as the Quantity purchased. There you can
enter the actual quantity to be returned. Price of returned item,Tax Rate,Qty to
be updated to stock,Qty to be replaced,Net Amount to return,Discount given etc.
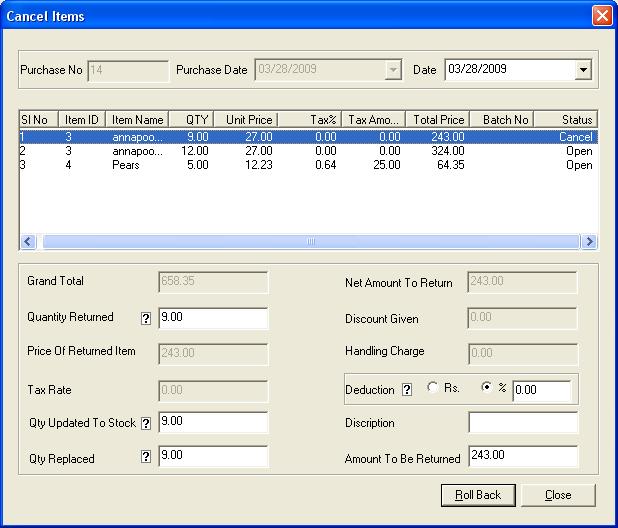
will be automatically filled. Then click RollBack button to rollback the
transaction. After rollback the status of the particular transaction will be
shown as Cancel.The Cancel Items window after rollback is shown in Fig
129.
If you want to Delete the purchase,Select a purchase from
the list and click on Delete.
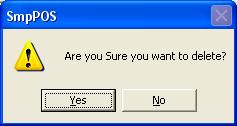
While clicking on Delete Button, a message will appear asking “Are
you sure you want to delete ?â€. If you want to Delete , click on Yes,
otherwise click on No. The Message is as shown in Fig 130.
Then the corresponding invoice number and the complete transaction will be
deleted from database.
Fig
127: Cancel Purchase Screen
Fig
128: Cancel Items Screen
Fig
129: Cancel Items Screen after Rollback
Fig
130: Message asking for conformation of Deletion.
Issue
Quotation
In this menu you can make quotation with or without
customer Details. If you want to include customer details then select Include
Customer Details from Setup->Default Settings->POS Default Settings.
By giving customer ID you can select customers. If you need
more details, then click on Find button. When you click on Find button,
another window Find Customer will appear.
Then you can select Item Id or Item Name and enter the
Quantity to be sold. In the case of Barcode Readers you need to enter Item Id
only. There is also a provision to change the category of any item.
If you want to print the receipt, then select Always
Print Sales Receipt option in from Setup->Default Settings->Print
Settings or alternatively you can tick the print receipt checkbox. You
can give Discount and Handling Charge by selecting Allow Handling Charge,
and Allow Discount option from Setup->Default Settings->POS Default
Settings. You can also select Method of Payment. Net Amount, Tax Amount and
grand total will generate automatically.
Issue Quotation Window is as shown in Fig
131.
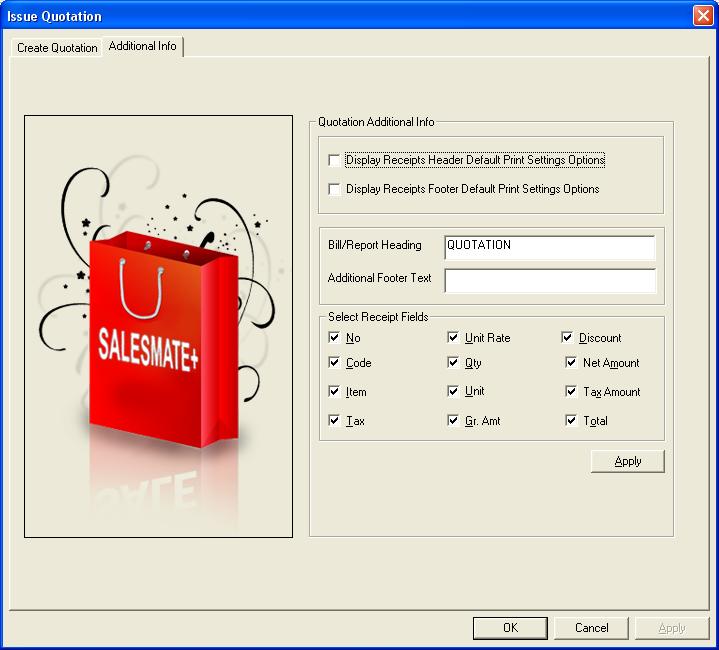
It
is also possible to set the Quotation Bill/Report Heading
using the Additional Info tab.This tab is as shown in Fig 132.

Fig 131: Issue Quotation Window
Fig
132: Additional Info tab
Sales
Checkout(Quotation)
In this menu you can convert a quotation to sales order
with or without customer Details. If you want to include customer details then
select Include Customer Details from Setup->Default Settings->POS
Default Settings.
By giving customer ID you can select customers. If you need
more details, then click on Find button. When you click on Find button,
another window Find Customer will appear.
Then you can select Item Id or Item Name and then enter the
Quantity. In the case of Barcode Readers you need to enter Item Id Only. There
is also a provision to change the category of any item.
If you want to print the quotation details, then select Always
Print Sales Receipt option in from Setup->Default Settings->Print
Settings or alternatively you can tick the print receipt checkbox. You
can give Discount and Handling Charge by selecting Allow Handling Charge,
and Allow Discount option from Setup->Default Settings->POS Default
Settings. You can also select Method of Payment. Net Amount, Tax Amount and
grand total will generate automatically.
If you want to adjust the Bill amount with Customer
Balance, Select Customer Adj Button, enter the amount and click Ok.
Quotation Sales Checkout Window is as shown in Fig
133.
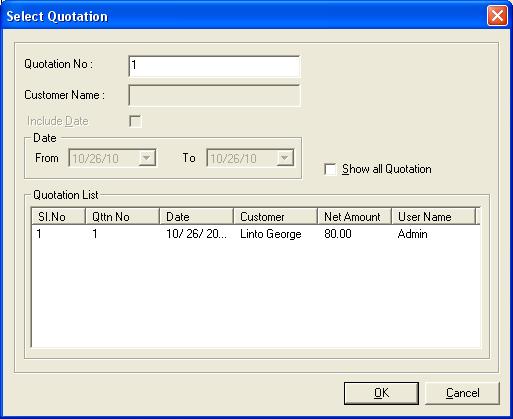
you can also convert an existing quotation to sales
order by clicking on QUOTATION button. When you click on
QUOTATION button, another window Select Quotation will appear. Select
Quotation Screen is as shown in Fig 134
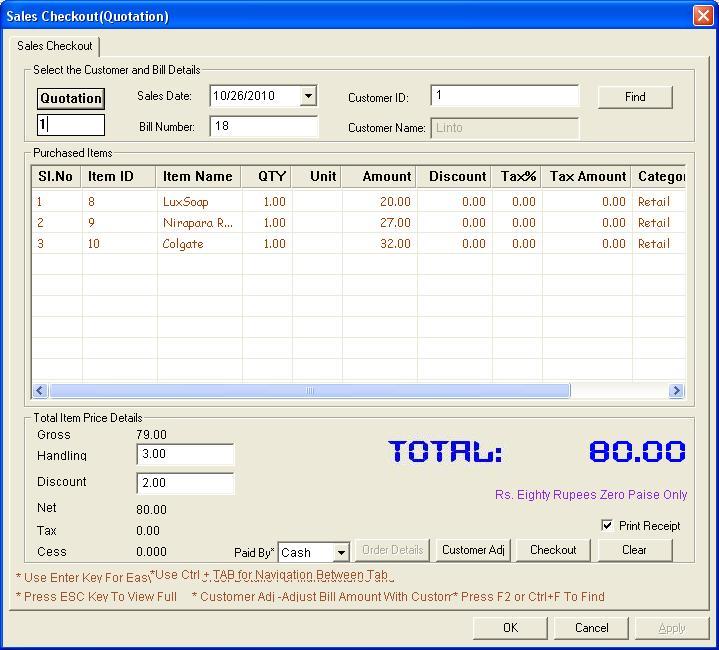
Fig 133: Sales Checkout Window for Quotation
Fig
134: Select Quotation window
E
Filing Wizard
According to the Kerala value added tax rule, from
01-01-2009 onwards every shop owner in kerala should submit their returns
through online. i.e through the website of kerala Commercial tax department.
This e-filing wizard will help you to submit your returns through internet.
In order to do e-filing from SalesMatePlus
you should click E-filing wizard from POS menu. A welcome page to E filing
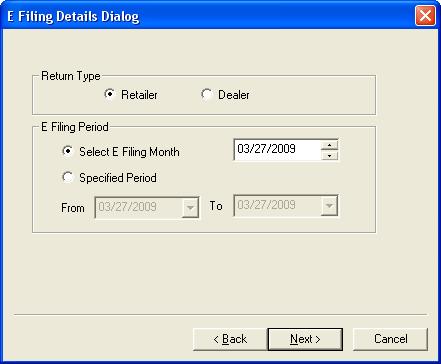
wizard appears. Click Next button to start E filing. Select E-filing
month /specified period and return type. Return type is either Retailer or
dealer and this depends upon the shop. The window is shown in Fig135.
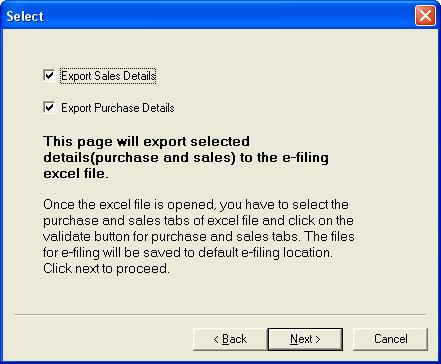
After entering these details, click Next button. This page will export
selected details (purchase and Sales) to the e-filing Excel file. The window is
shown in Fig136 ,tick the check box and click Next
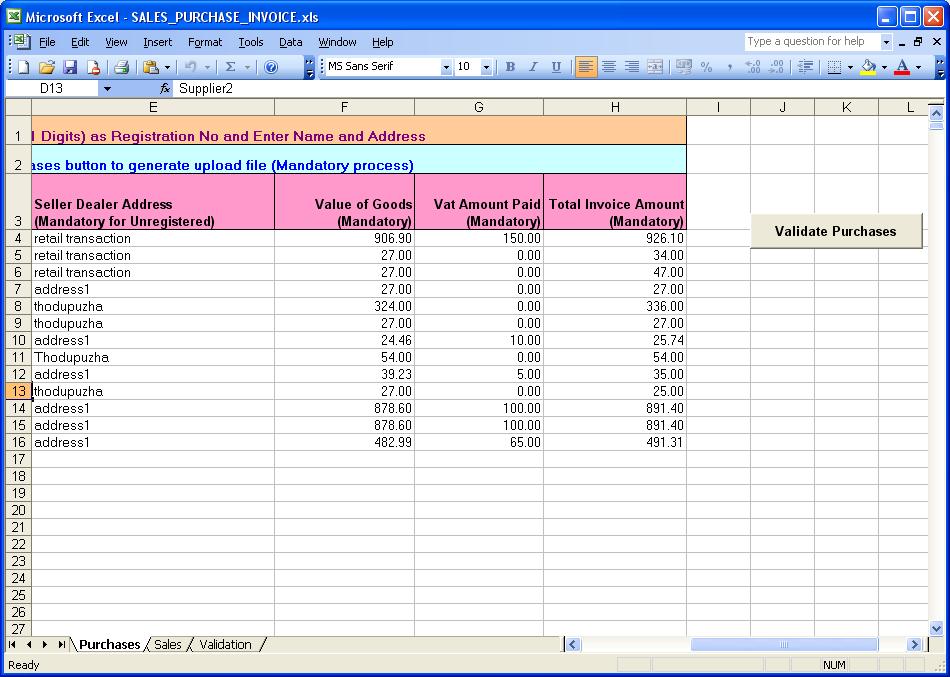
button. Then an Excel sheet will be displayed in which the purchases and sales
done in the particular period/month automatically generated. The purchase tab is
shown in Fig137. There is a Validate Purchases button.
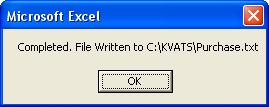
Click the button. If all the details are correct then the purchases will be
exported. And you will get a message shown in Fig138 .
If you dont have any purchase just uncheck the Export purchase details
checkbox.
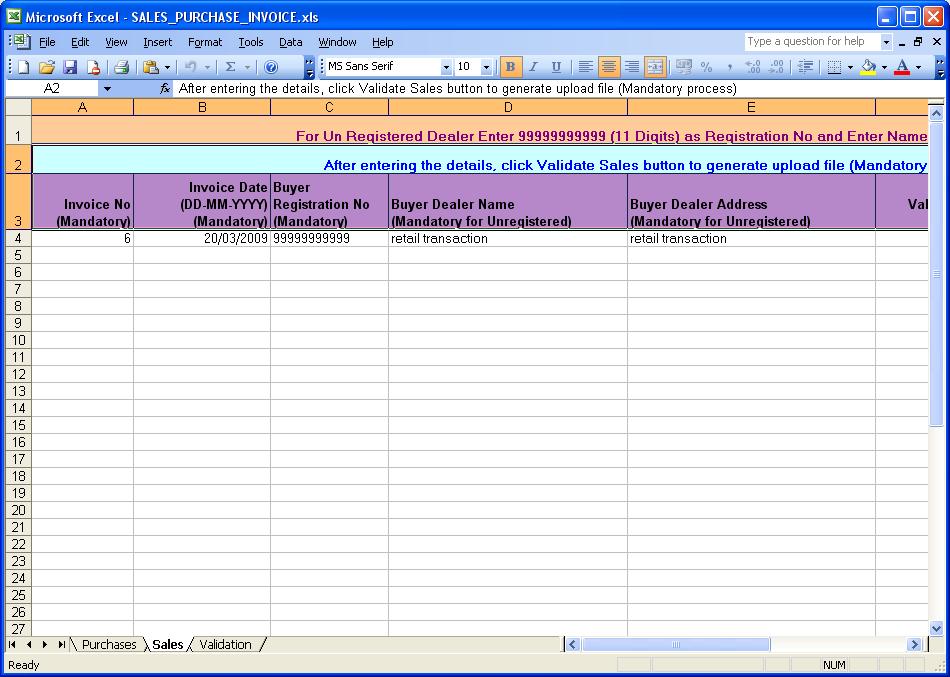
Click the sales tab. The excel sheet contains the sales
details filled automatically. Window is shown in Fig139
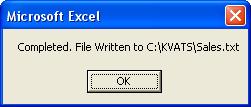
.There is a Validate Sales button. If all the details are correct then
the sales will be exported. And you will get a message shown in Fig140
. If you dont have any sale just uncheck the Export sales details
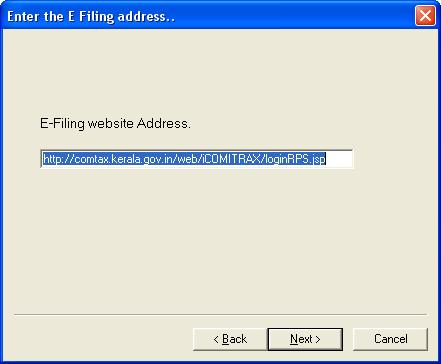
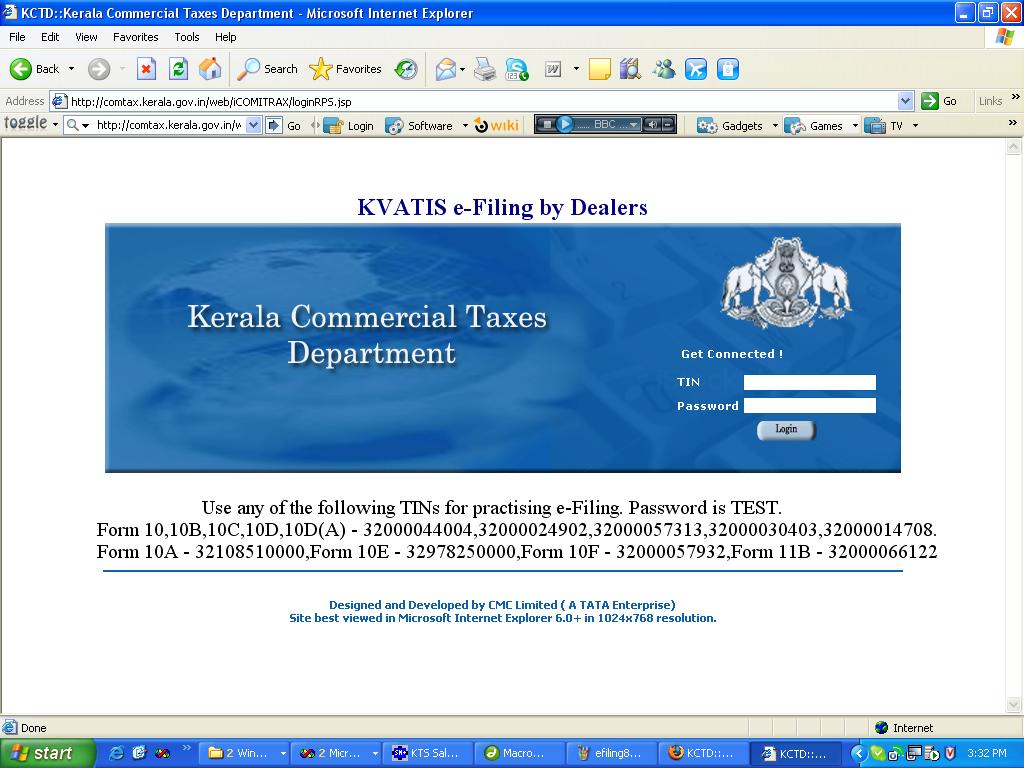
checkbox. Next page contains E filing site address (eg:Kerala Commercial Taxes
Department site.) as shown in Fig141 . You can
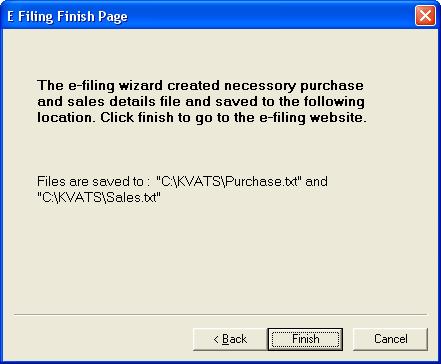
select your E-filing site there.Click Next button again and click Finish
as shown in Fig142 . The Files will be saved into
"C\KVATS\Purchase.txt" and " C\KVATS\Purchase.txt".After selecting Finish
button you will be automatically diverted into the site address given as shown
in Fig143 .
Fig
135: E filing Wizard 1
Fig
136: E filing Wizard 2
Fig
137: E filing Wizard 3
Fig
138: E filing Wizard 4
Fig
139: E filing Wizard 5
Fig
140: E filing Wizard 6
Fig
141: E filing Wizard 7
Fig
142: E filing Finish page.
Fig
143:After finishing e filing wizard user will be redirected to this page.